Animated Pixel Sprites: Build Characters That Move
An animated pixel sprite is a small character drawn frame by frame, then exported as a GIF or sprite sheet. To make a good one, lock the character design first. Animate simple colored shapes before you add detail. Keep the feet on one row in every frame. Play it back at the size players will see. If you use RPG Maker MZ or MV, finish by fitting the art into the engine’s 3×4 character grid.
This guide covers that workflow from a blank canvas to a working in-game sprite. It also covers facial expressions, poses, walk cycles and character variations.
TL;DR
- Start with a fixed character design and guide layers, so proportions don’t drift between frames.
- Animate rough colored shapes first, then detail them frame by frame, and check playback at display size.
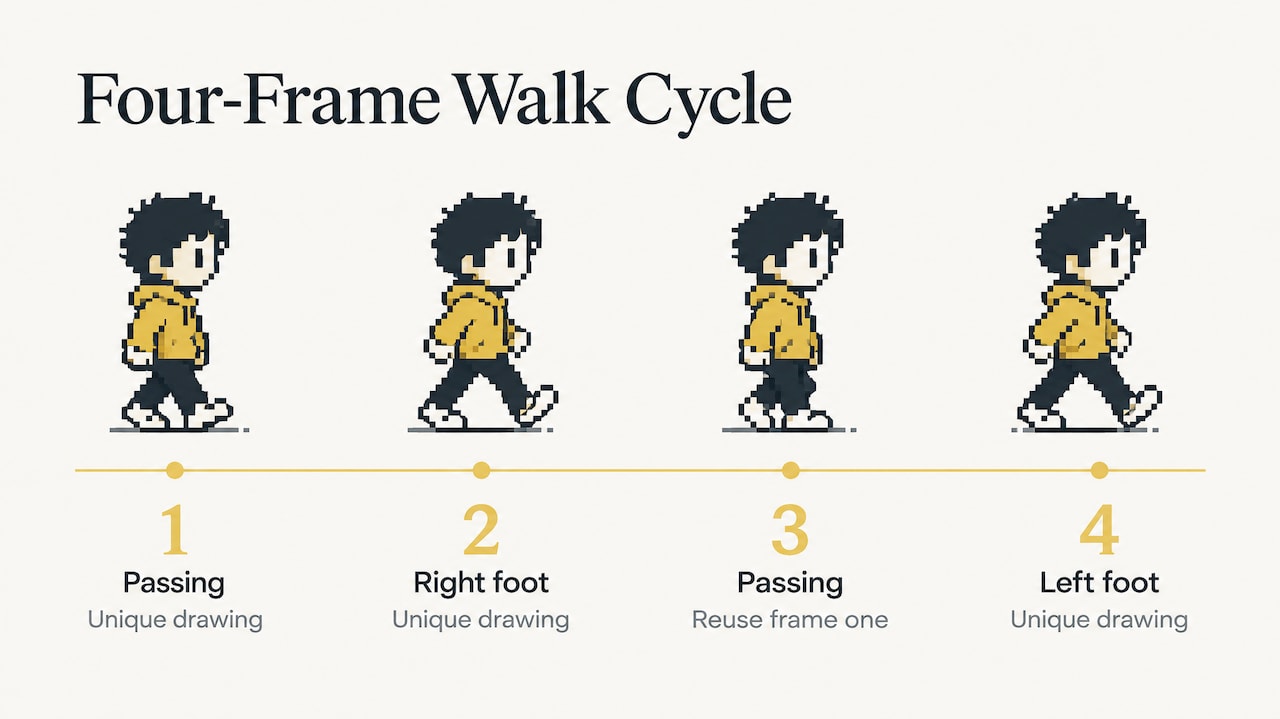
- A four-frame walk cycle needs only three unique drawings. Start at 100 to 150 ms per frame.
- Spend your pixels on the eyes and brows. One pixel of change is enough to shift an emotion.
- RPG Maker MV and MZ read a character as 12 equal cells: three columns, four rows. Name single-character files with a
$prefix.
Table of Contents
- Set up the sprite before you animate it
- Animate in blobs first, then detail
- Build a walk cycle that loops
- Keep poses consistent across frames
- Draw facial expressions that read at tiny sizes
- Make character variations without losing the character
- Export for RPG Maker MZ and MV
- Add motion to the rest of your game
- Our perspective
- Get the rest of your project moving
- FAQ
- Sources
Set up the sprite before you animate it
Most animation problems are setup problems. A character whose head grows two pixels between frames looks like it is breathing, whether you meant that or not.
Kyle McArthur’s beginner process for pixel animation starts with a detailed character design and constant guide layers. These stay visible for every frame and keep proportions and details from drifting. A ground line helps, and so does a ghosted center reference.
Pick a canvas size
The LibreSprite getting-started guide defaults to 32×32 px with RGBA color and a transparent background. It suggests 16×16 or 32×32 for characters and items. Those two sizes are where most RPG sprites live, and they decide how much face and costume you can fit:
| Canvas | What you can show |
|---|---|
| 8×8 | Body pose carries nearly all the emotion |
| 16×16 | A face may occupy about 5×4 pixels, so a one-pixel brow move is a big change |
| 32×32 | You can separate eyelids, brows and mouth |
The table comes from the 2D Game Developer Pathway lesson on pixel sprites. Its advice is to spend pixels on the eyes and head angle before small costume details.
Set frame timing early
In LibreSprite you set each frame’s duration in milliseconds. 100 ms equals 10 frames per second, and the guide’s example sprite uses 120 ms. Save the working file in your editor’s native format, then export a GIF or a sprite-sheet PNG when you are done. Keeping the layered original means you can fix a frame later without redrawing it.
Animate in blobs first, then detail
The fastest way to get readable motion is to delay detail. McArthur calls this stage “blobbing”. You split the character into visually distinct, simple shapes on separate layers: head, torso, each arm, each leg. Then you animate those shapes roughly, define them, and only then detail them frame by frame.
This works for three reasons:
- Timing problems show up while they are still cheap to fix. A blob is five seconds to move. A finished frame is ten minutes.
- Separate layers let you shift a part by a pixel or two without redrawing the body.
- Onion skinning, which shows faint ghosts of neighboring frames, keeps the movement smooth.
A Clip Studio tutorial on looping sprite animation takes the same layered approach. Body parts sit in separate layers inside pose folders. You shift a few pixels on selected layers to create a new pose. The last pose should lead back into the first, so the loop has no visible seam.
Whatever you use, view the animation at its intended display size. A sprite that looks fine zoomed to 800% can turn to noise at 1×.
Build a walk cycle that loops
The walk cycle is the animation every RPG character needs, in four directions. Treat it as a short list of key poses.
The BMCC introduction to 2D animation course breaks a walk into four poses:
- Contact: one foot is planted firmly and the other has just landed.
- Passing: one foot passes the planted one.
- Down: the head is at its lowest point.
- Up: the head is at its highest point.
The course builds from four frames up to eight, with the arms swinging opposite the legs.
The four-frame shortcut
For small sprites, Pixnote’s character guide says a four-frame walk needs only three unique drawings: passing, right foot forward and left foot forward. The passing frame is reused as frame 3. That cuts your work by a quarter and keeps the loop even.
Stop the sliding
Two habits make the difference between walking and skating, both from the same Pixnote guide:
- Keep the feet on one line. The lowest pixel of the feet should sit on the same row in every frame.
- Move the body up by one pixel on the passing pose.
Timing
Pixnote suggests starting a walk at 100 to 150 ms per frame, which is seven to ten frames per second. Go faster and the feet flicker. Go slower and the character looks like it is wading through water. Adjust by adding in-betweens or holding certain frames longer. A held frame often fixes a stiff walk better than a new drawing.
Keep poses consistent across frames
Consistency is mostly discipline. Keep the original design and setup layers visible as guides for every frame. Use the ground line to anchor the feet and the ghosted center reference to hold shape, size, volume and proportions. Play the animation back often, not just at the end.
A few checks to run before you call a pose done:
- Flip between the new pose and the neutral pose. Does the head stay the same size?
- Check the silhouette in solid black. Can you still tell what the pose is?
- Compare the pixel count of the torso and legs against the guide layer.
- Look at the pose at 1× scale, not zoomed in.
If you will draw a character in several poses, such as idle, walk, attack and hurt, draw all of them against the same guides. That is what makes them look like one person.
Draw facial expressions that read at tiny sizes
Expressions in pixel art are mostly about the eyes and brows. Pixeli’s rules for eyes and expressions say eyes get their pixels first and are never the thing you cut. The eye size should follow the head size:
| Head height | Eye size |
|---|---|
| 8 px | 1×1 |
| 12 px | 1×2 |
| 16 px | 2×2 |
| 24 px | 3×3 |
| 32 px | 5×4 |
| 48 px | 7×5 |
| 64 px | 11×6 |
The same page gives the brow rule. One pixel of tilt carries emotion: an inner end angled down reads as angry, and an inner end angled up reads as sad or worried. Keep eye spacing constant. Break perfect symmetry by one pixel so the face feels alive.
One base face, many moods
To keep identity steady across expressions, change only the brows, the lower lid and cheek, and the pupils on a base face. Pupil position sets the gaze. The rest of the face stays put, so the character remains recognizable.
Placement matters as much as drawing. According to PixiMelon’s guide to tiny pixel faces, eyes at 16 to 32 px are only two to four pixels in total. One pixel lower reads as tired, and eyes set one pixel apart read as stern or vacant. Its tip is to draw twenty variants on a scratch layer and keep three.
Portraits for dialogue
Animated game portraits are the same idea at a larger size. Draw a neutral base, then make each emotion a small set of changes: blink, brow lift, mouth shape. A two- or three-frame blink loop on an otherwise still portrait gives a surprising amount of life. In RPG Maker, face images use their own sheet format, so check the engine’s face sheet size before you build a full set.
Make character variations without losing the character
You will likely want a hero in three outfits, or one villain template that becomes ten villagers. The goal is variation that keeps the silhouette and core features fixed.
A practical approach:
- Lock the identity features. Choose two or three things that define the character, such as hair shape, a scarf or a signature color. Never change them.
- Vary the secondary features. Clothing colors, accessories and held items can change freely.
- Reuse the animation. Once the walk cycle is built on layers, swapping an outfit layer or recoloring a layer gives you a new sprite with the same timing.
- Test in a crowd. Put the variants next to each other at 1×. If two look the same, change the value (light versus dark) first, then the hue.
Organizing each sprite on separate layers pays off here. Skin, hair, outfit and accessory each stay on their own layer, so you can recombine them instead of redrawing.
Export for RPG Maker MZ and MV
The engine is strict about how a character sheet is laid out, and it won’t warn you when you get it wrong. It just shows the wrong slice of the image.
Studio Xehryn’s tutorial on RPG Maker spritesheets gives these rules:
- A character has exactly 12 sprites of equal size, in three columns (animation frames) and four rows (directions).
- At 48×48 px per sprite, the sheet is 144×192 px.
- Walking goes middle, right, middle, left, middle.
- A
$at the start of the filename marks a single-character sheet. Without it, the engine treats the sheet as a block of eight characters. - A
!prefix cancels the small upward offset and turns off bush translucency. The offset is 6 pixels in MV and MZ, and 4 in VX Ace. - For VX Ace, the default sprite is 32×32 px, so a character is 96×128 px.
This three-column layout shapes your cycle. The engine gives you a middle frame and two stepping frames. That is exactly the three-unique-drawings walk described above, so a sprite built that way drops straight into the grid.
A short pre-export checklist:
- Canvas width is three times the cell width, and height is four times.
- Rows follow the engine’s direction order. Check against a default character before you commit.
- The filename starts with
$for a single character. - The feet sit on the same row in each cell.
- Background is transparent.
Add motion to the rest of your game
Characters are only part of what moves. Water, torches, flowers and doors need animation too, and drawing every tile by hand is slow. Our Tile Animation Forge for MZ and MV is built to help with animated tiles in those engines. For static art that matches your sprites, browse tilesets and art, and see the dev tools for workflow helpers.
Our perspective
Most indie teams don’t fail at animation because they can’t draw. They fail because every extra asset costs time they don’t have. A character sprite is only one piece of a game that also needs maps, effects, music and menus.
That is why we build RPG Maker Market around saving hours. Our browser-based generators make original audio without installing software, and our plugins, tilesets, sprite packs and tools are made for RPG Maker MZ and MV. Many of them are free, because we want hobbyists and solo developers to finish games.
Our advice: draw the character you care about, the hero, and let ready-made, commercially licensed assets cover the rest of the world. That keeps your own pixels focused where players look most.
Brandon
Get the rest of your project moving
If your sprites are done and the world around them is not, start with the Lifetime Supporter Pass. It is our all-access option, covering every RPG Maker tool, music generator and asset we publish. If you only need one thing, browse our audio generators or plugins.
We publish many free items alongside paid ones, so you can build your project step by step. Visit RPG Maker Market to see what is new.
FAQ
How many frames does an animated pixel sprite need?
For a walk cycle, four frames is enough, and only three of them are unique drawings. The passing frame is reused. Eight frames gives a smoother, more detailed walk if your style calls for it. RPG Maker characters use three columns, so a three-drawing walk fits the grid.
What speed should a pixel walk cycle run at?
Start at 100 to 150 ms per frame, about seven to ten frames per second. Faster can make the feet flicker, and slower can make the character look as if it is walking through water. Adjust by holding or adding frames rather than only changing the speed.
What size should my RPG Maker character sprite be?
The common size for MV and MZ is 48×48 px per cell, which gives a 144×192 px sheet for a single character. The sheet always has three columns and four rows. Name single-character files with a $ prefix so the engine reads them correctly.
How do I show emotion on a very small sprite?
Spend your pixels on the eyes and brows first. A one-pixel brow tilt changes the mood, and moving the eyes one pixel up or down changes how alert the character looks. At 8×8, rely on the body pose instead of the face.
Sources
- Kyle McArthur, The Process of Pixel Art Animation
- LibreSprite getting started
- 2D Game Developer Pathway, Pixel Sprite Creator & Animator
- Clip Studio Tips, Looping sprite animation
- BMCC, Introduction to 2D Animation, Week 7
- Pixnote, How to Draw Pixel Art Characters
- Pixeli, Eyes and expressions
- PixiMelon, Pixel Art Faces
- Studio Xehryn, Character Spritesheets and Animations